Sunday, July 10, 2011

DIY wall art

I needed something for the wall beside my couch. It is a big open space and the first thing you see when you enter the house.

I tried a mirror, but it was way too skinny and just looked wrong. Last summer, while at an art fair, I saw art created using pictures of letters and have always wanted to make some. I had the original intention of taking my own pictures but never got around to it. The other day I found leo reynolds on flikr. He has already done the work with tons of letters, numbers, and punctuation to choose from.

I downloaded the highest resolution and created my art with photoshop elements 9. Lucky that walgreens was running a 20% off sale on posters. I had it printed 20"x30". I was worried it might be pix-elated because it wasn't exactly the size walgreen's wanted, but it's perfect. The frame is a poster frame from Michaels $14.99 with a 40% off coupon. The whole thing cost was $30 for a custom art piece. I LOVE IT!

What do you think?

How to make your own vintage tablecloth


I looked and looked for a vintage tablecloth to match my kitchen and nothing seemed to work just right. So I decided to make one myself.


I found the  Meadow sweet fabric from Michael Miller and I knew it was PERFECT.

I was originally going to make a quilt tablecloth but decided simple was better, I like to change my decor too much to spend a lot of time on things.

I used the dot material for my curtains, and found some matching yellow for the tablecloth.

I used 3 yards of the meadowsweet splashy rose fabric, 2 yards of yellow cotton, 3 packages of red medium rick rack, and 3 packages of red wide bias tape.

I cut the yellow into strips about 8 inches wide and sewed it to the floral fabric (i figured a 5 inch drop on all sides of the table) 

I sewed them on all 4 sides, overlapping at the corners.
I then layed out my ric rac and bias tape, realized I was about a foot short on both, went to the fabric store, came back, and pinned it on. I sewed right on the seams.

Having bias tape on the edges saved me the step of putting in a hem. The bias tape wrapped around the unfinished hem and left a clean edge.

And here it is on my kitchen table. I think it fits perfectly. :D

Third times the charm!

 I have always dreamed of an elegant hall with chandeliers and beautiful architectural details for my wedding reception...reality check......elegant halls with chandeliers are EXPENSIVE!!

I dreamed of being married at the Henry Clay building from the first time I heard it was being remodeled:


isn't it gorgeous...

But at $3500 for 4 hours and you must use their super expensive caterer...not in the budget.


So I settled for the Old Medical School Building.
Pretty on the outside...gorgeous lobby and stairwells for pictures....but a boring hall for the reception. 
It's not terrible...but needs some help.

I checked ebay....but at $15 a piece..still out of the budget...so I decided to DIY it! 

I first found this beauty at dollarstorecrafts.com.

My version was not so pretty. I didn't even take a picture it was so bad. VERY bling....note don't use silver beads.

Then I found this one at http://www.craftstylish.com and this one at weddingbee.com and thought maybe I could do it with the cricut and Scal program...by the way LOVE the Sure-cuts-a-lot program. You can cut almost any image or font on your computer without having to by expensive cartridges.

The weddingbee version was also a flop. The home decor cricut cartridge chandelier was too flimsy and drooped after just an hour.

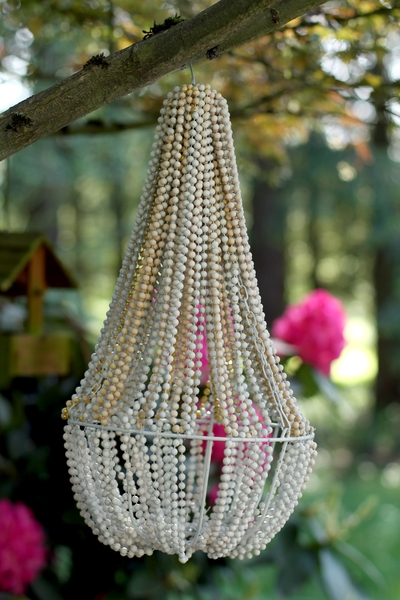
I had almost given up on the dream when I found this beauty.

Total cost for 12 chandeliers: $11.75 (definately within budget)

for each chandelier you will need:

2 sheets of posterboard (we cut then into 12x12 sheets for the cricut)
glue (we found elmer's white glue and a foam brush worked best)
chandelier crystal (I bought a crystal garland at Hobby Lobby in the wedding section $4.99 on sale)
 fishing line

I'm sure you could cut these out by hand with a craft knife, but I purchased the Scal2 file and it made life so much easier. She also included a PDF with instructions. http://littlepurplepansie.blogspot.com

We did change a few things, we tried spray adhesive, but found it messy and it dried too quickly to match up the chandelier pieces correctly. We brushed on good old Elmer's glue and it was MUCH easier.

I also added some bling and our monogram (also cut with the cricut). I added the fishing line before gluing the last 2 chandelier sections together, then glued 2 "E"s together with the fishing line in between and tied on the  crystal.
I need another pic in the daylight...maybe tomorrow...

3 more finished chandeliers

cutting with the cricut (helps to have 2 mats when doing big projects)

pieces waiting to be folded and glued

the fiance patiently scoring the pieces
.

What do you think?


I was featured on DIY Friday at
Weddingbee the wedding blog |  |DIY wedding invitations | DIY save the dates | wedding resale

Friday, July 8, 2011

Chevron Envy

Oh West Elm why do you tease me so?

They sent me a coupon for 20% off all rugs, so of course I check it out and I find this beauty

an Ivory and expresso chevron rug. But at $199 for a 5'x8' rug, definately not affordable.

Solution: I found this over at House of Smith's

source: http://www.thehouseofsmiths.com/2011/04/chevron-painted-rug-from-ikea.htm
I could do this!!  Now to talk the Fiance into driving the 2 hours to the nearest IKEA.

A bit more chevron eye candy from West Elm


I just love Chevrons

I LOVE the 4th of July

Our parents have finally met, and got along fantastically...YAY!! 
 All of our friends got to see the new house.
 and it is still standing....barely.  

That brings me to the question: Why do rednecks always buy the biggest fireworks?  When I went to the fireworks store to buy sparklers, they asked if I had any kiddos at home. Can a grown woman not enjoy a few sparklers?
My stupid, white trash neighbors, on the other hand, bought huge mortars, then let them off on their slanted sidewalk. Long story short, the canon fell over, hit a bunch of kids sitting on their porch a few houses down, and started my tree on fire. No one was seriously hurt, just a few blisters, but that ended their night. The cops were called and it was a very crazy way to end an otherwise fantastic housewarming/independence day party.  

A few of the highlights of the day:
alcoholic flag jello...courtesy of http://sharonjohnsonphotography.blogspot.com/2011/06/4th-of-july-and-flag-jello.html with a little rum in the red jello

cornhole


and SPARKLERS!


Hope you had as much fun as we did!

Wednesday, July 6, 2011

No more SHARPIES!

My house numbers were written on the siding with SHARPIE marker...who does that? So trashy, It had to go!! Although through my friends off a bit, that's how they found my house :( Now I get..."we found your house because it's the most crafty and decorated one on the street!" (I'm a bit proud of that:D)

I found a few pieces of 2x4 in the garage and had the boy cut them both 12 inches long. I then painted them with patio paint (great stuff for painting things that need to withstand the weather) and let them dry.

There is probably a better way to do this, but to stick them together I used E6000 glue and 2 Popsicle sticks which I stuck to the back for extra hold. Then I let it sit overnight.

Plan A: I tried to be cheap and use contact paper for my stencil...big FAIL!! I ran it through the cricut to cut out my numbers and then tried to stencil it with a foam brush. The paint leaked out and the edges were all feathery (is that a word?) If you plan on using it as a paint stencil, spend the few dollars and buy vinyl.

Plan B: I wiped off the still wet black paint, and repainted them white. I let them dry, stuck on a new contact paper stencil, traced it with a pencil, pulled it off, and repainted them by hand. Way more time consuming, but much cleaner lines!

I just happened to have another little wooden heart from making my wreath, so I added a hook to the bottom. I like changing things, so now it can always match the holiday.

Then came the problem of how to hang it. I didn't want to put a nail in the siding (it is a rental house), so I used a small command hook. NOTE: make sure you clean the siding good first! The first strip didn't stick because of the dirt on the house. It seems to have worked pretty well...2 storms in the last few days and it's still holding strong.


And this is how it looks with my new front porch.

thinking the mailbox needs some cricut love??

Sunday, July 3, 2011

My FI is CRAFTY!

I love my fiance. He spent the whole lazy day  with me watching movies and making paper flowers. That's right WE made paper flowers. I had tried them previously using Martha Stewart's tutorial for coffee filter flowers with lackluster results.
Not anything like Martha's fabulous flowers. :(

Then I found a fabulous tutorial on weddingbee.com and it was on!

http://diy.weddingbee.com/topic/coffee-filter-flower-pic-heavy-tutorial-with-tips

This tutorial simplifies Martha's to using only 3 different petal sizes and painting and curling the petals before you put them together. I put the FI to work. He outlined the petal shapes, then I cut them out (poor baby said it hurt his hands) and passed them back to him to paint pink
Turning the FI pink!

Hard at work painting petals
 We rocked out 45 of these little beauties, and I have enough prepared petals to create 30 more. So exciting!! We plan to make about 150 of these fabulous creations. That way we have enough to put 4 in each paper "vase" to hang on the pews and some left over to create some alter arrangements.

This would mean that all our flowers for the ceremony will cost less than $20. SWEET SAVINGS!!  I'm thinking about adding feathers too (too keep with the theme).
petals drying


This is what the flowers will look like hanging on the pews
I'm indecisive. Should I add feathers? White or silver "vases"  I have 3 months...plenty of time to decide.
 
So tell me...What do you think?

My lovely wreath

After painting the front porch and cleaning the back porch I still had a few hours of daylight left and I wanted a wreath and to cover up those ugly sharpie house numbers. While storing sutff in the garage, I found a few boards and a some foam pipe insulation and was inspired.

I have a strange love of wreaths and door hangers, but actually own surprisingly few. I end up throwing them out after each holiday and starting over, so for this wreath I decided to use velcro and a chalkboard. That way I can just change the stuff when I'm tired of it. YAY!!

Here is my wreath:


I found a few inspirations from the web, but ultimately came up with my own design.

 You will need:
linings from the old dresse

2 yards of muslin fabric
a pair of old blue jeans for the leaves
polyester lining or silk fabric (I used the lining of my sister's old bridesmaid dress which were cut out so they could re-wear them for a "27 dresses party)

To create ruffles:
I used the tutorial from positively splendid ...so easy!! Just set your sewing machine tension to the highest level and set it to the longest stitch length and it ruffles for you. I cut the about 1 inch strips with pinking shears. Sorry no pics of the process, I'm new to this.

To create the flowers:
I cut several different size circles from the lining then ran the edges along a candle flame. The edges will turn a little black, but you can trim it off if you want. I chose to leave it as it kept with the rustic look. Then I threaded a star button and sewed through all the layers.

For the leaves:
I used pinking shears to cut leaf shapes from an old pair of jeans and then ran it through my sewing machine. They curl nicely!

I then glued the flowers, leaves, and a wooden heart I had to a piece of felt and added velcro to the back.

I wrapped the ruffled strips around the form, securing with hot glue as I went (in retrospect - should have used low temp glue. The hot glue melted right into the wreath). I added velcro for the flowers and glued on a slate (bought from Michaels). I tied on a ribbon, and hung it on the door.

note: we did have to go back and add a wire coat hanger to help the wreath keep it's shape. If I make another one I will do this before adding the ruffles.

Here it is on my newly painted front porch! So Patriotic.


Todays Creative Blog

Extreme Porch Makeover

Our house has good bones. I loved the built ins and moldings, but there were a few things I just couldn't stand. One of the things I hated most was the front porch.

When we moved in you could barely see the brick path to the door under all the weeds. That was an easy fix...lots of round up (although killer hand cramps - note buy the battery operated sprayer!!)

The porch also needed a coat of paint....badly....and the house numbers were drawn on with sharpie. (who does that?) Some areas of the porch were scraped down to bare wood and there were at least 4 visible paint colors. 
the siding
I started by spraying it all off with my "jet" nozzle hose, and accidentally stripped all the paint off the door frame. OOPS!!  Had to paint that too and get the scrub brush out for the siding. It was GROSS!


what the hose did..oops!

after I sprayed it with the hose..still gross!

I used a quart of Valspar Latex Porch & Floor Paint in Del Coronado Brickstone and a foam roller (total cost: $11)

It went surprisingly quick. I painted the front door and the spindles with left over Kilz paint (it's covered should be ok?) and then started at the door and painted my way to the steps. A foam roller is definitely the way to go with an uneven surface, it really gets into the cracks. While that was drying I decided to tackle the back porch.


It was even worse than the front. I wish I had taken a close up of the door! Obviously there was a big dog living here and it had caked mud all the way to the little window.

It took 4 hours of sweat and elbow grease to get it clean. I found out quickly that the hose had NO WATER  PRESSURE!!!  So it was all me and the scrub brush.

After 6 1/2 hours of back breaking, sweaty, dirty work, the outside was clean!

What do you think?


I also made a wreath for the front door, I'll share that with you another day. It's bed time!  Night bloggers!